BEFORE STARTING YOUR TRIP:
Store all objects safely. Close all doors cabinets, including the bathroom door and living area partition.
Completely fold away all blinds and mosquito screens. Correctly close all windows and skylights.
Store away the bed stairway and/or other loose fittings. Lock all tables, doors, and screens.
Lock all swivelling chairs in the travelling direction. During the trip all swivelling chairs must remain in this position.
Check that all indicating lights, lighting, steering and brakes function correctly.
Regularly check tyre pressures and profiles, before starting any trip or very two weeks.
Fasten your seat belt and keep it on throughout the journey. Secure children with appropriate child restraint systems based on their weight and height.
Manually unfold the side mirrors.
Release the hand brake: Firmly press the brake pedal. Pull up the hand brake lever to its full extent. Press the release button and push down the hand brake lever.
DURING THE TRIP:
Movement of any persons inside the vehicle is prohibited.
Safety belts must be worn at all times. Make sure all children are using safety retention devices adequate for their weight and height.
Remember that the motorhome is a larger and heavier vehicle than a normal car, so you must drive accordingly. Be careful with trees and shrubs, as there are objects on the roof that should not be scratched.
Mirrors are useful, but be aware that their protrusion carries a risk of hitting other objects.
Make turns with a wide radius.
Avoid driving on narrow streets. Consider the height of the vehicle before going under low bridges, tunnels or similar.
Avoid sudden braking. Consider that braking distance is greater than a normal car.
Avoid sudden turns.
Increase safety distance.
While you are driving, consider the vehicle height in: ○ Underground parking with heights less than 3 meters. ○ Certain service structures that can be too low. ○ Tree branches that hang over the road. ○ Narrow streets. ○ Sleeping policeman. ○ Bridges, level crossings, and overpasses. ○ Etc.
Perform the parking manoeuvre slowly and that way increase your safety and that of others. When parking backwards, do not wait for the wheels to reach the kerb: sometimes the overlap is large, therefore, take care with the rear part of your motorhome.
DURING YOUR STAY:
The vehicle must be parked on solid and uniform ground. In addition, to assure correct operation of all cabin devices, make sure it is completely horizontal. If necessary, use levelling chocks.
When parking the vehicle, use always the hand brake.
Turn off the radio button (display) located on the driver's side of the dashboard.
Always manually close the side mirrors when parking
Keep and aeration vents and systems open.
When leaving the vehicle, securely store all objects, close all cabinets, windows and skylights. Do not leave any door unlocked (septic tank emptying door, water tank filling door, gas tank doors, etc. - risk of theft).

PRECAUTIONS The gas and heating valves must be in OFF position while you are in petrol stations.
TYRES Tyre pressure must be regularly checked, before starting a trip and starting-up after a period of being put out of service. You can check the adequate tyre pressures for your vehicle on the sticker located in the driver position doorframe. The tyre pressure data is valid for a loaded vehicle with cold tyres. Therefore, the tyre pressure must be checked in these conditions. If this is not possible, consider that the pressure must 0.3 bars higher than in cold. In addition, when the tyres are cold, the pressures must be re-checked to assure they are correct. Remember that when circulating any incorrect pressure can cause serious damage to the tyres and they can even explode. This is especially hazardous because you may lose control of the motorhome.
WINDOWS AND SKYLIGHTS Check that all cabinets, doors, windows, and skylights are correct- ly closed and locked. Also remember to completely fold the mos- quito screens and blinds to avoid damaging them.
CABIN SEATS All cabin seats are adjustable in height and depth, reclining and equipped with armrests. If the distribution of your lounge allows it, the seats of your motor- home can swivel. To turn the seat, first you must unlock it using a lever that you will find under the seat. Then, check the inclination of the seat backrest and the longitudinal position of the seat allows turning without hitting the side panel, the door, or the steering wheel. After making these checks, turn the seat to the desired position. When returning to place the seat in the initial position, remember to block it before starting the vehicle. All swivelling seats must remain blocked during traffic.
CABIN BLINDS Your vehicle will be fitted with foldable cabin blinds. This system in integrated in the front windscreen frame, and in the pilot and passenger seats. To unfold all you need to do is unlock them and carefully pull on the tabs by the frame that covers the entire window or windscreen. IMPORTANT: When driving, the front and driver and passen- ger seat blinds must be open and locked.
\\WINDOWS \\ The cabins of our motorhomes are equipped with windows and skylights of plastic glass. The windows should be cleaned using only water and neutral soap. Detergents must not be used, even normal ones and a lot less those based on hydro- carbons or alcohol because these can alter the transparency of the glass or even cracks may appear. During traffic on roads, all blinds and mosquito screens must be kept folded and locked.
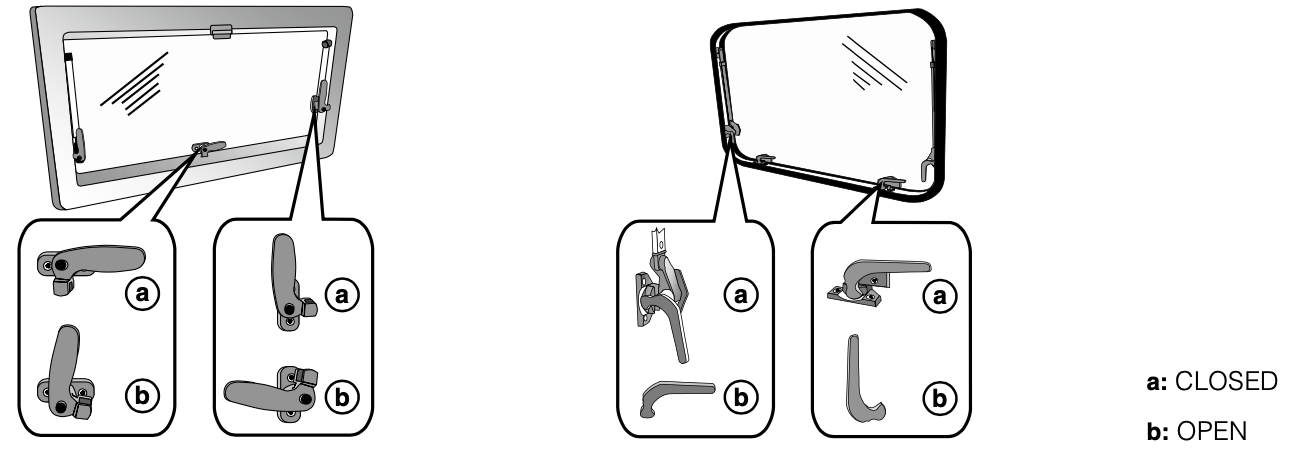
SKYLIGHTS • Completely fold the mosquito screens and blinds of the skylights and close them before starting the vehicle (check that the locking device works well). • Do not leave the vehicle with the skylights open. • Do not open the skylights if there is strong wind or rain. • Before opening the skylights remove, if necessary, any snow, frost, or dirt. • Fine scratches and some matt stains can be reduced with polish and a smooth cloth. • Acrylic glass of the panoramic skylights and of the cabin windows, must be exclusively cleaned with soapy water or with special products for acrylic glass. The use of any other product than soapy water has disastrous consequences for acrylic glass (deterioration, fissures...). • Blinds and mosquito screens must be exclusively cleaned with soapy water. • During daylight, in the case of solar radiation, the blinds of the skylights must be closed, at least up to two thirds of their length.

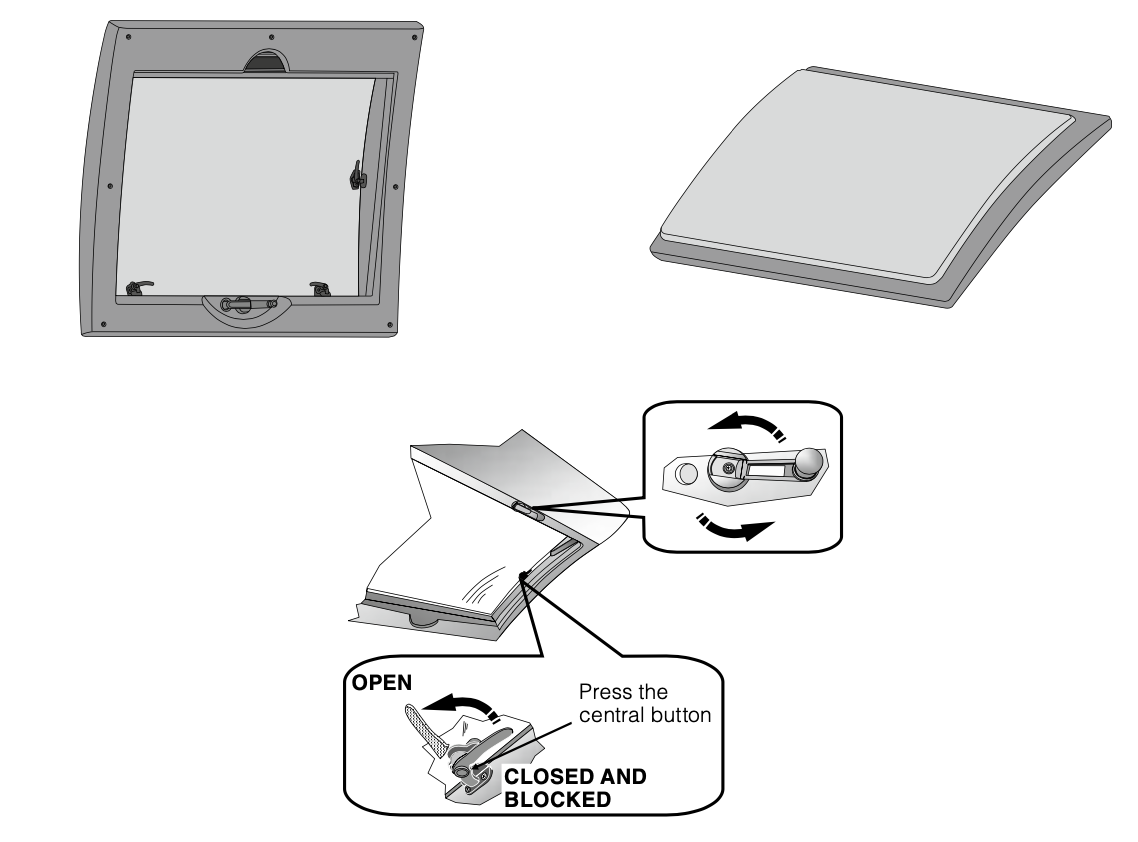
Dometic skylight Compact dome skylight with double acrylic glazing. It can be opened in three different positions with a handle: complete, halfway, and in the position for adverse weather conditions. The interior frame includes a blind and an independent adjustable mosquito screen.

MPK skylight (shower corner) Skylight of complete opening or in different directions. To open it, simply unlock it and push the levers. The interior frame includes a blind and an independent adjustable mosquito screen.

“Skyview” or panoramic skylights Skyview” or panoramic skylights are installed in the roof of all the profiled motorhomes and assure great luminosity to the vehicle lounge area. They are opened using a swivelling handle and have independently adjustable integrated mosquito screens and blinds.
CONTROL PANEL - MODEL PC180
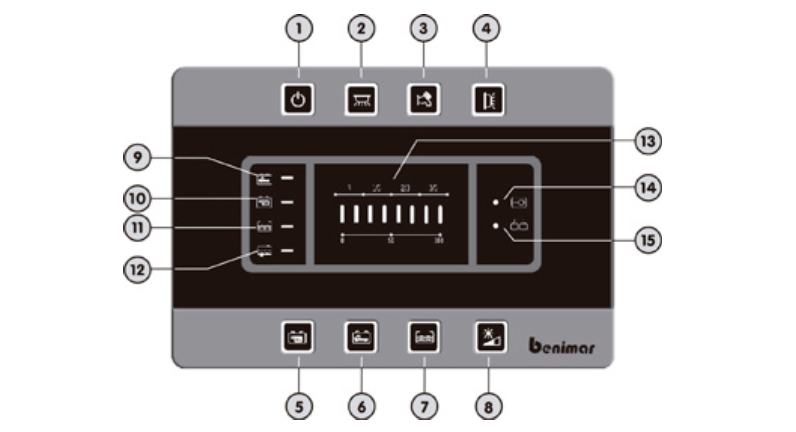
1.General ON/OFF button on the control panel. The blinking LED indicates that the battery is discharged and indicates that the low voltage device will be switched on. Note: When switching on, the panel makes an operational control of all the LEDs except 14 and 15. 2.Button “12V” for switching on/off of the lights and of the heating boiler. 3.Button that activates the water pump relay. 4.Button for activation of the exterior light. This will automatically be switched off when the engine starts. 5.Button for verification of the cabin battery (B2). 6.Button for verification of the engine battery (B1). 7.Button for verification and filling of the clean water tank. 8.Button with sensor integrated to adjust the intensity of the night- time back light LED (see twilight function). 9.If this symbol flashes, it means that battery B1 is discharged. 10.If this symbol flashes, it means that battery B2 is discharged. 11.If this symbol flashes, it means that the clean water tank is empty. 12.If this symbol flashes in red, it means that the wastewater tank is full. 13.LED display for checking the: • Voltage of batteries B1 and B2 (scale from 0 to 100%) • Clean water tank level (Reserve, 1/3, 2/3, 3/3). 14.Visual signal of the 230 V circuit connected. 15.Visual signal indicating that the cabin battery is being charged by the engine alternator.
CONTROL PANEL FUNCTIONS ENGINE BATTERY (B1) ALARM When the engine battery reaches a voltage less than 12 V the alarm is automatically activated and symbol 9 flashes. INTERIOR BATTERY (B2) ALARM When the engine battery reaches a voltage less than 11 V the alarm is automatically activated and symbol 10 flashes. INTERIOR BATTERY (B2) CHARGING a. With the alternator when the engine is running. b. With the 230V circuit using the battery charger. c. With the solar panel, through the regulator. LOW VOLTAGE CONTROL An electronic device cuts all the 12 V functions, when the B2 bat- tery reaches a minimum voltage level of 10 V. These functions can be restarted for one minute pressing the ON/OFF button. The fridge, the electrical step and the functions directly supplied by the B2 are excluded from this function. REFILLING OF THE CLEAN WATER TANK This function is used during the refilling of the clean water tank, indicating the water level during the process. Press during more than 5 seconds on button 7 to activate this function, until the LEDs of display 13 start to flash. To leave this function press one of buttons 5, 6, 7 or 8. TWILIGHT FUNCTION At night, thanks to a sensor located behind button 8, the LED back- light intensity is automatically reduced to a predefined level by the user (to adjust this, maintain button 8 pressed for more than 3 sec- onds until reaching the desired level).
Truma iNet X Panel / Truma iNet X Pro Panel
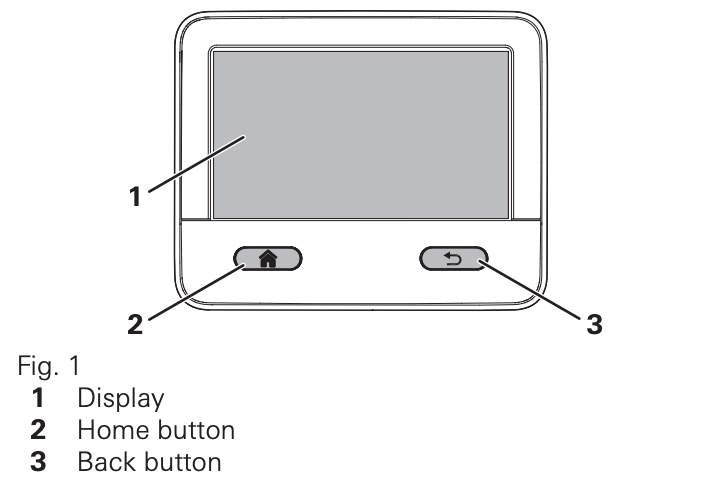
Operating instructions https://www.truma.com/service/download-center/
https://youtu.be/dSkW0dXl9sk?si=9MkZ6tfhxwl9NkZi
WATER INSTALLATION
-Motorhome is equipped with a clean water tank, a wastewater tank, and a pump connected to the control panel which will come on when any tap is opened.
-Before starting any trip, we recommend you clean and disinfect the clean water tubes and the tank. After each trip and when the motorhome is going to be without use for an extended period, you must completely empty the tubes and clean then and let them dry.
-The water must be periodically changed to avoid the formation of algae and bacteria. If you wish adequate commercial germicide for this can be used. Only fill the tank with drinking water, nevertheless, the water contained in the tank must not be directly ingested.
-When the vehicle is in extremely cold weather conditions and there is a frost hazard, the entire circuit must be emptied (tubes and tanks) as well as the water heater. Remem- ber that damages produced by freezing are not covered by the guarantee.
-Before using the taps, remember to refill the clean water tank and connect the pump from the control panel. Never use the water pump while the tank is empty, it can be damaged due to overheating. If there is no water, disconnect the pump from the control pane
CLEAN WATER TANK The capacity of the water tank is 100L Vehicle load. The clean water tank is filled from the exterior using the cover with the key indicated by a pictograph. To open and close the cover, this must be held by the hand, to avoid it rotating when turning the key in the lock. The pressure must be between 2.5 and 3 bars therefore, if necessary, a special adaptor must be used situating it at the end of the water inlet tube.
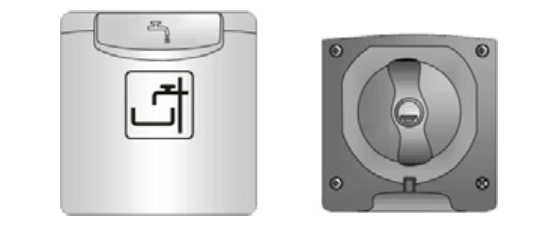
WATER CIRCUIT PURGING The water installation tubes are supplied with the assistance of an electrical 12 V pump. To pressurise this: Never use the water pump while the tank is empty
Check that the water tank is not empty.
Check that all the taps are closed.
Start the 12 V pump from the cabin control panel. For more infor- mation you can consult section 7.2 Control panel.
Open all the taps in the cold-water position, the water pump will connect and the cold water tubes will fill. Leave the taps open until the water stops running with bubbles.
Do the same with the hot water.
After that the installation is ready to operate. Remember that any purging defect of the circuit (presence of air in the tubes) can cause problems or even impede the operation of the water heater.
WASTEWATER TANK Wastewater produced in the wash basin of the kitchen, the shower, and the basin, are collected in the wastewater tank. Never empty boiling water directly into the basin or sink drain. Boiling water can cause deformation and leaks in the tubing system. An indicator light is seen on the control panel of the vehicle cabin when the wastewater tank is full.

Under the vehicle, marked by a pictograph on the bodywork, you will find the outlet tube and the con- trol lever for emptying the tank.
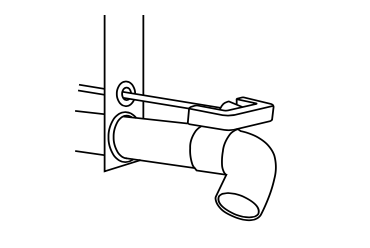
To empty the tank, first you must place the vehicle, so the drainage tube is located over the drain. Then you only have to pull the lever towards you to open the drainage valve and, once the tank is emp- ty, return it to the initial position to close the guillotine valve.
GAS INSTALLATION
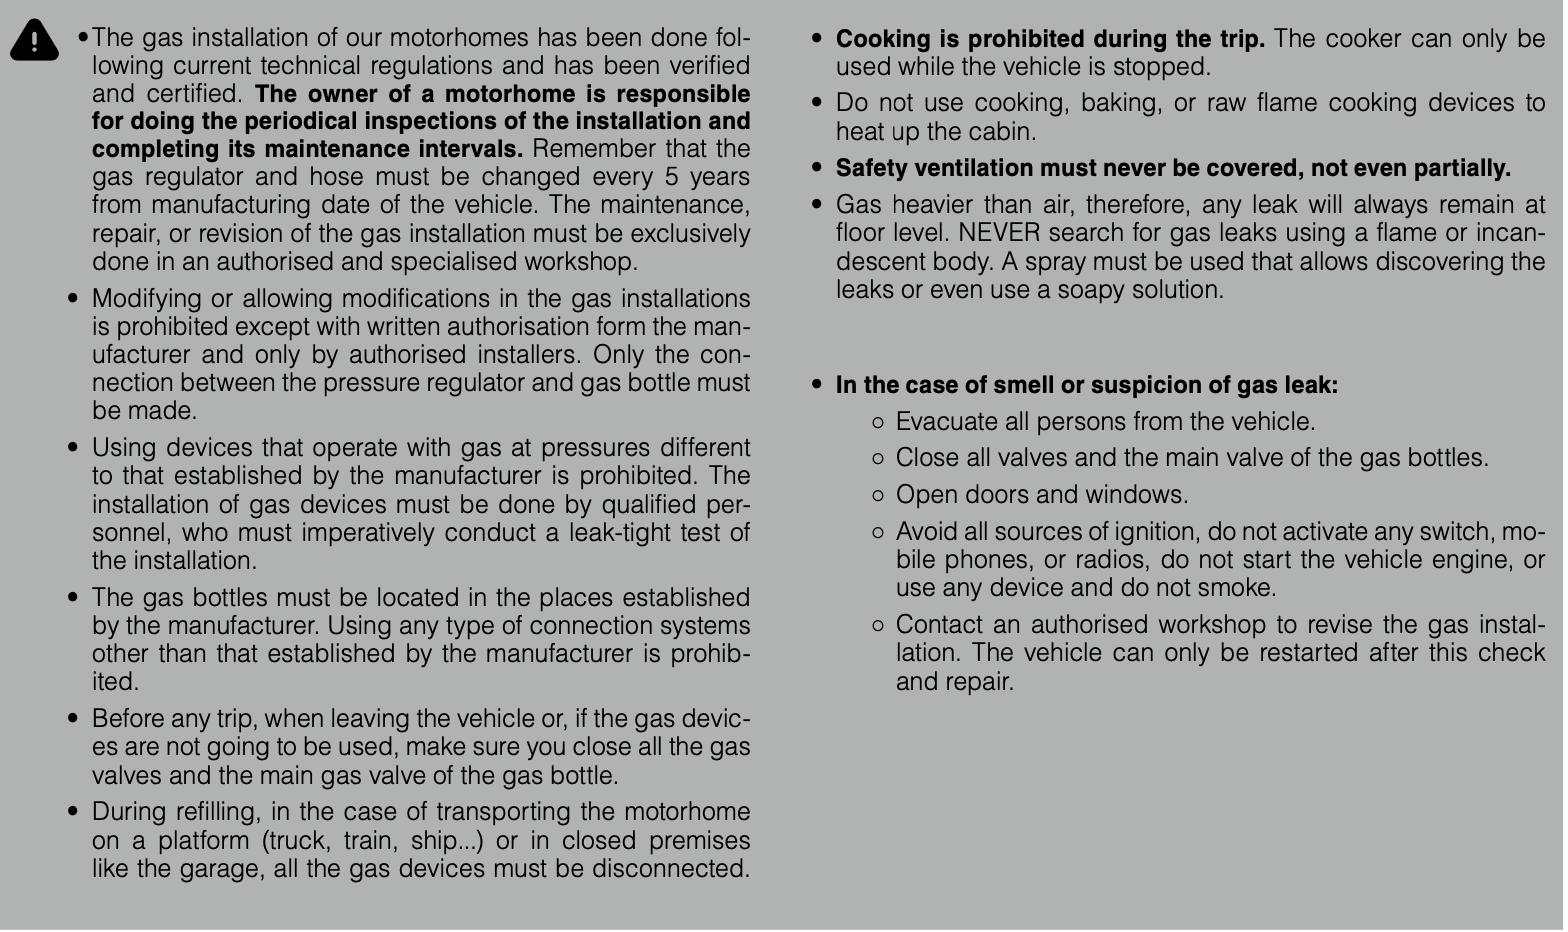
Your motorhome is prepared for the use of liquified, propane, or butane gas. Never use city gas or natural gas.
The door giving access to the one standard 13 kg gas bottle is located outside the vehicle and, extra space for a reserve bottle (the standard gas circuit only allows connecting one bottle of gas). The connection elements of your vehicle are, in standard format: • One flexible tube. • One regulator to adjust the pressure to 30 bars which is the nominal operational pressure of the devices connected to the installation.
To install the gas bottle correctly:
If it is changing an empty bottle for a new one, remember to close the empty bottle valve before disconnecting the regulator.
Place the new bottle in the compartment correctly assuring with the belts established.
Connect new pump regulator checking that the gas tube is not subject to any force by traction or twisted.
If you have space for the reserve bottle, must be assured and covered with its protective cover.
The ventilation grilles of the gas compartment must never be obstructed.
GAS VALVES Your motorhome has a valve for each device installed that operates with gas. These valves work as a tap and can separately open or close the different outlets. Generally, this is usually found under the cooker and has a pictograph to indicate the device to which it be- longs due to varying according to the equipment.
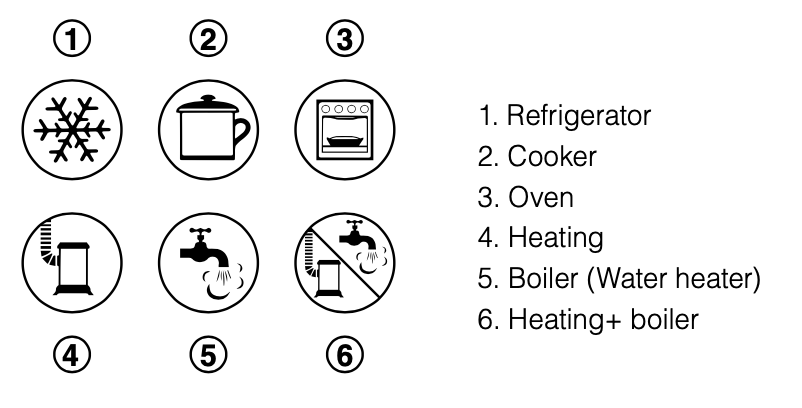
Each device is equipped with a safety device that cuts off the gas flow in the case of accidental extinction of the flame. The operation of the valves is very simple, each one has 2 positions: open or closed. • Valve open: You must place the selected valve in the same direction of your gas tube for its to start flowing. An arrow on the valve allows controlling its position and a sticker reminds the correct direction.
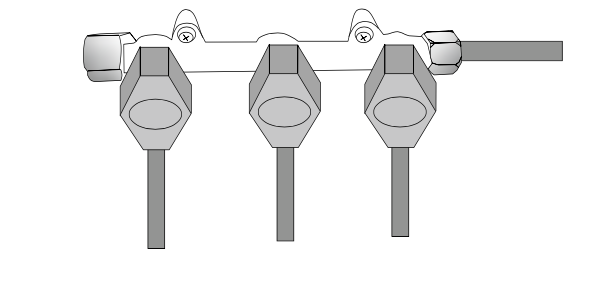
Valve closed: The valve must be in transversal position to the gas tube.
SUPPLY OF THE DEVICES
Check that the valves of the different devices are closed.
Open the main valve of the gas bottle.
Then, open the valve of the desired device.
Proceed with turning on the device. Consider that the turning on may require a certain period due to purging the air from the tubes.
To close the circuits, follows the opening steps in reverse order.
REGULATOR WITH COLLISION SENSOR The safety gas pressure regulator has a sensor that, in the case of detecting abnormal acceleration/deceleration of the vehicle (accident, abrupt braking...), automatically interrupting the gas flow.
The regulator with integrated collision sensor MonoControl CS by Truma, is installed in all models equipped with Truma Combi heating. The heating operation during the trip is only allowed if you vehicle has this device and if the legislation of the country where you are allows it
When the pressure regulator is activated, it must be reinitiated to return to the normal operation of the gas circuit.
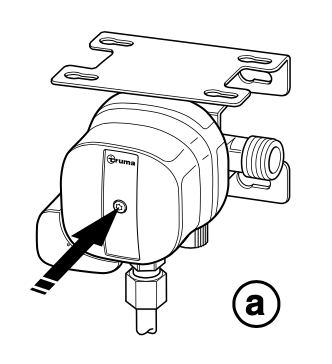
To restart, slightly turn the yellow button and keep it pressed for 10 seconds (make sure that the regulator is in vertical posi- tion) and check that the restart is correctly completed by putting a gas device of your motorhome into operation. If it does not work, repeat the operation. In the case of operational defect, please contact an authorised workshop
LOUNGE TABLE FOLDABLE TABLE: The table has two different sizes because it can be used either folded or unfolded. In this latter case, remember to extend the metal support of the table foot for its correct support to avoid damaging it. Multi-position central telescopic table foot (manual): The table board can be displaced, and it has two height positions. The table foot is fixed to the floor of the motorhome. Remember that before starting each trip the mobile boards of the tables must be fixed.
KITCHEN - GAS COOKER 1.Open the glass cover of the cooker.
Open the main gas valve.
Press and turn the corresponding control of the burner you want to use from the “0” position to the maximum intensity position: • For models with electronic ignition: Some models have a button that must be pressed at the same time, others do this automatically.
Once the flame is ignited, keep the control pressed for at least 10 seconds and then release it.
Adjust the desired flame intensity by turning the control between the maximum and minimum positions.
Check that the flame diffuser, the covers, and the grilles are correctly positioned.

IMPORTANT: • When igniting a gas cooker (and during its use, always leave at least one window or skylight open. • Do not leave any kitchen device unattended while in use. • Use of the cooking hob while changing the gas bottle and inside a garage is strictly prohibited. • Do not use the cooking hob while driving. • Only use the device to cook and not for anything else or as a way of heating. • In the case of fire, do not extinguish the flames with water.
ATTENTION: The cooking areas and the surrounding surfaces get very hot. Do not touch surfaces that reach high temperatures because this may cause serious injuries. Check that there is, at least, 1 cm between the cooking recipients, the glass covers, the hinges, and other plastic components. In the case that your cooking hob has 2 glass covers, while using the burners, we recommend raising both of them. If one is not raised, obligatorily there must be a distance of at least 1 cm between the pot or the pan and the glass cover. Do not close the cooking plate cover during operation.
FRIDGE AND FREEZER
To assure correct operation, the motorhome must be hori- zontal. A 5o inclination will cause the refrigerating power to be reduced.
Absorption refrigerators will function in the temperature margin indicated as normal room temperature (approx. 21 oC). At considerably higher temperatures (>30 oC) the refrigerator power will be reduced.
OPERATING
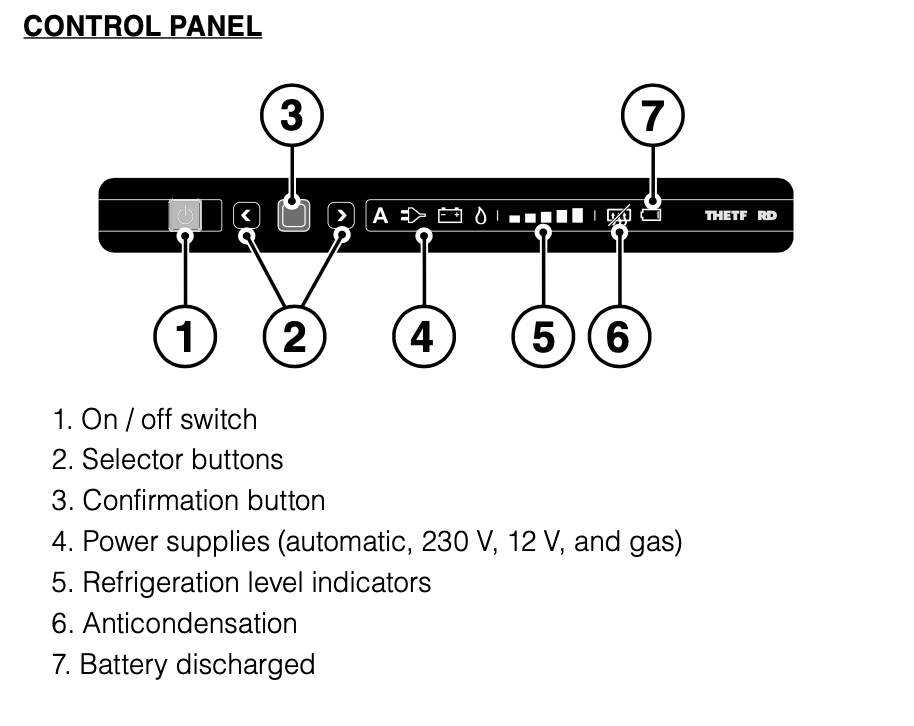
Press switch “1” for 1 second to switch on the refrigerator.
Press button “3” for 2 seconds and, when the supply symbols start to flash, select the power supply you desire with the selec- tion buttons “2”. Press button “3” to confirm the selection.
Press button “3” again. The level indicators will start to flash. Select the desired refrigeration level with the selection buttons “2” and press the confirmation button “3”.
We recommend adjusting the refrigeration level to 3 for a room temperature of 15 oC to 25 oC. A higher temperature will need higher refrigeration level and a lower temperature, a lower level.
POWER SUPPLIES There are 4 power supply modes available:
Auto: The refrigerator automatically selects the best source available (in this order: electrical network, battery, and gas). “A” and the selected source will be illuminated.
230 V: The refrigerator is powered by the main electricity network.
12 V: The power supply comes from the vehicle battery. This power supply is only effective with the vehicle engine running.
Gas: The refrigerator is powered by the gas bottle. Due to safety reasons, switching on the flame within 15 minutes after starting to drive is not possible.
After 1000 m above sea level there may be physical problems when switching on the gas. FOOD STORAGE AND ENERGY SAVINGS • Respect the expiry date printed of the food packages. • Always keep the food in closed recipients, correctly wrapped, well stored, etc. • Never store hot food, always let it cool before. • Do not conserve food susceptible of emitting volatile and flam- mable gases. • Perishable foods must be stored nears the cooling vents. • When you remove food form the refrigerator, keep the door open for the least time possible. • The refrigerator may not be apt for adequate storage of medicines, because there is no guarantee that the temperature re- mains stable. Consult the instructions included with the medicine. • The freezer is capable of forming ice cubes and for short term conservation of frozen food. It is not adapted for freezing food. • Do not expose the refrigerator to direct sunrays. Consider that the temperature in a closed vehicle exposed to the sun can increase a lot and affect the performance of the device. • Do not obstruct the ventilation grilles that are in the sides outside your motorhome. The air absorption system has always to be well ventilated. • The refrigerator must be regularly defrosted. DEFROSTING With time, a layer of frost can form on the refrigerating vanes. The refrigerator includes an automatic defrosting system that avoids the formation of ice, but also it can be manually defrosted. To do that:
Remove all the food and the ice cube tray.
Switch the refrigerator off and open the doors.
Put a towel in the freezer and at the lower part of the refrigerator compartment to collect the water that may come out.
After the defrosting, remove the water that may remain with a dry cloth.
Re-connect the refrigerator, as previously indicated. Do not try to accelerate the defrosting process removing the layer of ice by force, with sharp objects, with a hairdryer or any other electrical device because this may damage the refrigerator.
BATHROOM
Never use the shower as storage space, any objects can damage or break the shower tray. Remember to rinse any excess soap after your shower, otherwise fissures may appear in the shower tray.
In traffic, fix the enclosure with its retainers to avoid it being damaged.
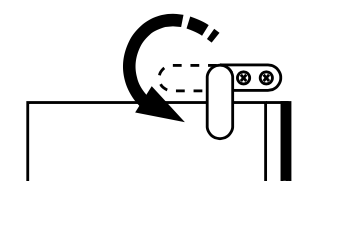
While showering, completely close the enclosure to avoid that a large quantity of water comes out of the shower. Dry the walls of the shower and the enclosure after using it, to avoid condensation of the humidity.
Assiduously ventilate the bathroom, above all after using the shower or after drying any wet clothes in it: close the door and open the skylight. That way, air circulates better.
CHEMICAL TOILET
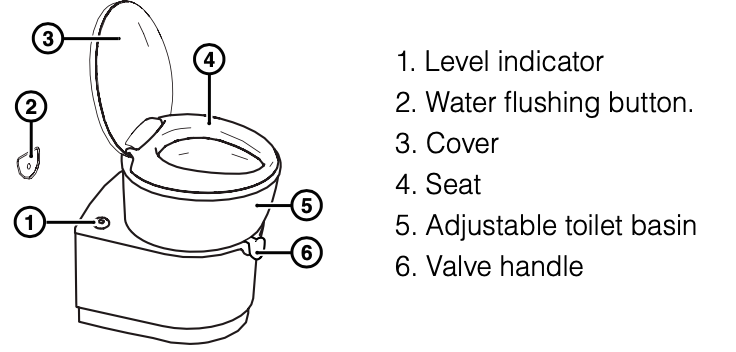
Never add sanitary additives directly through the toilet ba- sin valve, this could damage the residues tank seal.
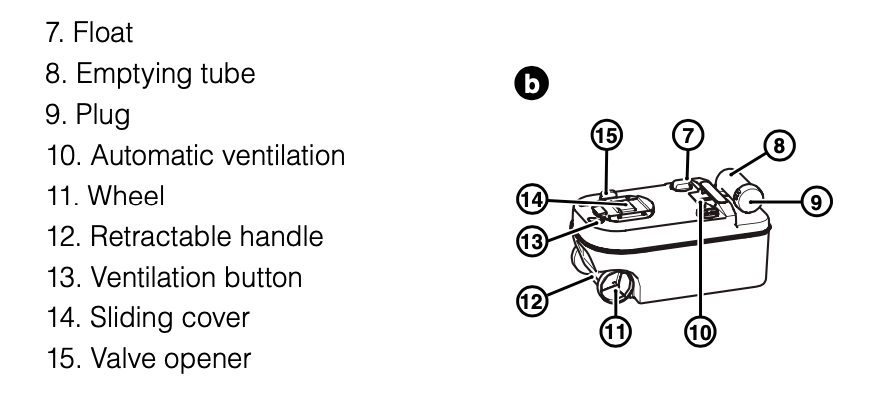
EMPTYING OF THE WASTEWATER TANK The toilet has waste tank level indicator. When the indicator (Ref. 1) colour changes from green to red, this means that the tank is full.
Check that the valve is closed.
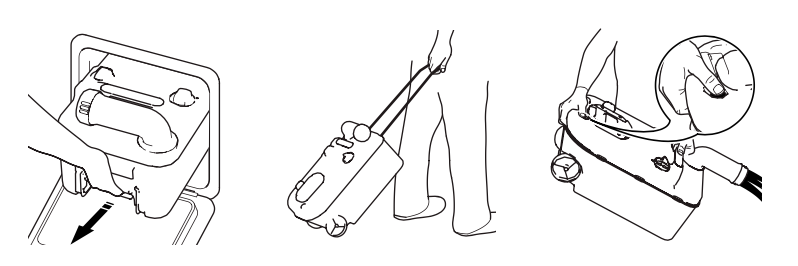
Open the access door to the residues tank and remove it.
Place the tank on the ground in vertical position and completely extract the retractile handle (Ref.12).
Go to an authorised place for emptying residues.
With the tank in vertical position, direct the emptying tube (Ref. 8) upwards and remove the plug.
Take the tank with two hands and empty its contents in the adequate place. To avoid splashes, keep the ventilation button (Ref. 13) pressed with your thumb while the emptying tube is directed upwards.
After emptying, add approximately 3 litres of water into the waste tank and reinsert the plug.
Smoothly agitate the tank to clean it and re-empty it.
Turn the float (Ref. 7), remove it to rinse it under the tap and re- store to its place.
If you want to continue using the toilet, you must prepare the waste tank again for use.
Return the emptying tube and the retractile handle to their initial positions.
Situate the residue tank in its position in the vehicle and, after making sure it is well placed, cover, and lock the door.

Never travel with a waste tank which has more than 3⁄4 parts of its capacity. This can cause leaks.
CLEANING AND CONSERVATION
EXTERIOR Normal exterior conservation consists in periodically washing your vehicle. Remember this must be done very often in areas of greater environmental contamination, after a trip on snowy roads or close to the sea. Never use roller systems or pulled ones for the bodywork because you run the risk of deteriorating or tearing of the ventilation structures of the motorhome and damaging windows and skylights. In addition, water could enter through the gas exhausts or the ventilation grilles. Neither high pressure systems can be used. BODYWORK • To clean the exterior bodywork of polyester we recommend using a large quantity of cold or warm water and then, dry it completely with a shammy leather. Only wash your motorhome in specific places for washing vehicles. In the case of resistant dirt, add a soft soapy detergent to the water. • Do not direct a water jet directly on the doors, windows, skylights, and ventilation holes to avoid splashes of water that can enter into the vehicle. Neither on electrical parts nor plug connections. • Control the protection status for underneath the vehicle once a year. In the case of deterioration consult with your distributor. • For better conservation of the bodywork, we recommend treating the polyester parts with wax once a year. • The cleaning products used for the chassis area (for example, tar or silicone cleaners) must not enter into contact with windows and skylights. WINDOWS AND SKYLIGHTS • Never dry clean the windows and skylights because the dust particles will scratch their surface damaging them. Never, use window cleaner, abrasive products or dissolvents, or cleaning products that contain alcohol. If you do that, the material will be weakened, and later cracks will be formed. Also, any product that can cause scratches must be avoided. Only clean them with warm water, some soft soap, and a sponge or clean shammy leather. In the case of resistant dirt, we recommend using a special cleaning product for acrylic glass. In the case of not complying with these instructions, the manufacturer guarantee will be cancelled. • Condensation may be formed inside the double-glazed acrylic windows. This will disappear in time, nevertheless, it is a long process. • The mosquito screens and integrated blinds can be cleaned with a soft brush. In the case of resistant dirt, add a soft soapy deter- gent to the water. Then, let them dry well. OTHER SUGGESTIONS • Talcum powder can be applied to the rubber seals of the doors, windows, and skylights, so they last longer. • You can use a specific product to periodically grease all the mobile parts of doors, windows, and skylights. INTERIOR Remember to never use corrosive or abrasive cleaning prod- ucts. Only use soft commercial cleaning products. In addi- tion, avoid using anything that can cause scratches. FURNITURE • The furniture of your motorhome is coated with “paper-thin” laminates, therefore sponges with abrasives faces must never be used or they can be damaged. • To clean the furniture, we recommend using a specific product and a shammy leather. • Evidently, the use of adhesive wallpaper is not suggested due to the risk of damaging the original finish. TEXTILES • We recommend regularly vacuum cleaning all textiles of the vehicle. • Avoid direct sunlight on upholstery and cushions as they may de faded. If possible, immediately remove any stains. Clean upholstery textiles with dry foam or with soft soap foam. In the case of large or very embedded stains we recommend visiting a dry cleaner. Clean the synthetic leather covers with a shammy leather and soft soap trying not to soak them or let water filter into them. We recommend that curtains and lace curtains be cleaned in a dry cleaner, nevertheless, it can also be done in a conventional washing machine. Remember to remove the rods from roller blinds before washing. FLOOR • The floor of the cabin is covered with a PVC laminate which is best cleaned with a vacuum cleaner. For deeper cleaning, a damp mop can be used and a specific product. • In the case of having rugs, remember to not put them onto damp floors. The rugs can stick and damage the floor. In addition, mould can be formed. • Never use any abrasive or aggressive cleaning product. Neither must wax be used. • Remember to avoid the presence of sand on the floor because this can scratch and deteriorate the PVC coating surface. GAS COOKING COOKER AND SINK Never clean the sink and the gas cooker with an abrasive product containing sand. Avoid anything that can cause scratches. Specific commercial products can be used. When cleaning the burners of the gas cooker, special attention must be given in that water does not enter the burner holes Wash the surfaces of the work top with soft soap and a shammy leather. If your motorhome is equipped with an extractor hood, when you notice that its power has dropped, clean the filter with hot water and some soft soap. A good suggestion to prevent scale is to reduce water hardness with a specific product. Do not use corrosive agents in waste pipes or boiling water because this could damage the water circuit tubes or the syphon. REFRIGERATOR • Clean inside and outside of the device regularly. • Only clean with water, soft soap and shammy leather. Dry well. • Once a year we recommend eliminating dust form the refrigerator motor, access to which is through the upper ventilation grille. To do that, use a paintbrush or soft brush. BATHROOM • Do not use corrosive agents in waste pipes or boiling water because this could damage the water circuit tubes or the syphon. • Do not clean the toilet or plastic parts with solvents or cleaning products containing alcohol. Do not use abrasive products as these may cause cracks. Only use water, a soft commercial prod- uct and a shammy leather or sponge. • Only use soft commercial anti-scale products that cannot damage plastics. • The seals in the faecal wastewater tank and the cover must be periodically cleaned. TANKS • Before every filling, always thoroughly clean the tanks and water tubes with commercial cleaning product and a large quantity of water. • Before starting the vehicle, carefully clean the water tanks, wash them thoroughly, completely empty them and let them dry (you can find more information in section 8.2 Putting out of service) • For more information about emptying the water tanks and tubes, you can consult section 7.4 Water installation. OTHERS • Due to solar radiation possibly the plastic parts become yellowish, this is not considered of a lack of quality. • Do not use solvents or abrasive products on the plastic parts inside the cabin. Otherwise, cracks may appear. • Clean the surfaces, furniture handles, lamps, and plastic parts of the cabin with a damp cloth and shammy leather. • We recommend greasing the hinges of doors regularl